A sushi night at home sounds fancy, but it is one of the easiest and most fun dinners you can make yourself. You do not need raw fish. You do not need chef skills. You just need sticky rice, a few fresh fillings, and a free evening. This guide walks you through everything step by step, from cooking perfect sushi rice to rolling your first maki like you have done it for years.

A homemade sushi spread with simple beginner-friendly rolls. Photo by Priscila Guimarães via Wikimedia Commons (CC BY-SA 2.0).
Why a DIY Sushi Night Works So Well
Sushi night is interactive, which is exactly why people love it. Everyone builds their own rolls, picks their own fillings, and laughs at the first wobbly attempts. It costs far less than a restaurant meal. It also suits almost every diet, because you control what goes inside each roll. Vegetables, cooked shrimp, crab sticks, egg, avocado, tofu — the choices are wide open.
It is also a great dinner-party idea. Lay everything out buffet-style, and guests roll their own. Nobody needs to be an expert. The first roll is always the ugliest, and it still tastes great.
Essential Ingredients for Simple Sushi Rolls
You need fewer ingredients than you think. Most of them keep well in the pantry, so one shopping trip sets you up for many sushi nights.
Sushi rice. Buy short-grain rice labelled "sushi rice." Long-grain or basmati will not stick together, and the rolls will fall apart.
Nori sheets. These are the dried seaweed sheets that hold the roll together. They come in packs and last for months if kept dry.
Rice vinegar, sugar, and salt. This simple trio turns plain rice into proper seasoned sushi rice.
Fillings. For beginners, the best fillings are cucumber, avocado, cooked shrimp, crab sticks (kani), sweet omelette (tamagoyaki), and cream cheese. Cut everything into thin, even strips so the rolls close neatly.
Soy sauce, wasabi, and pickled ginger. These are for serving. A small dish of each at the table is all you need.
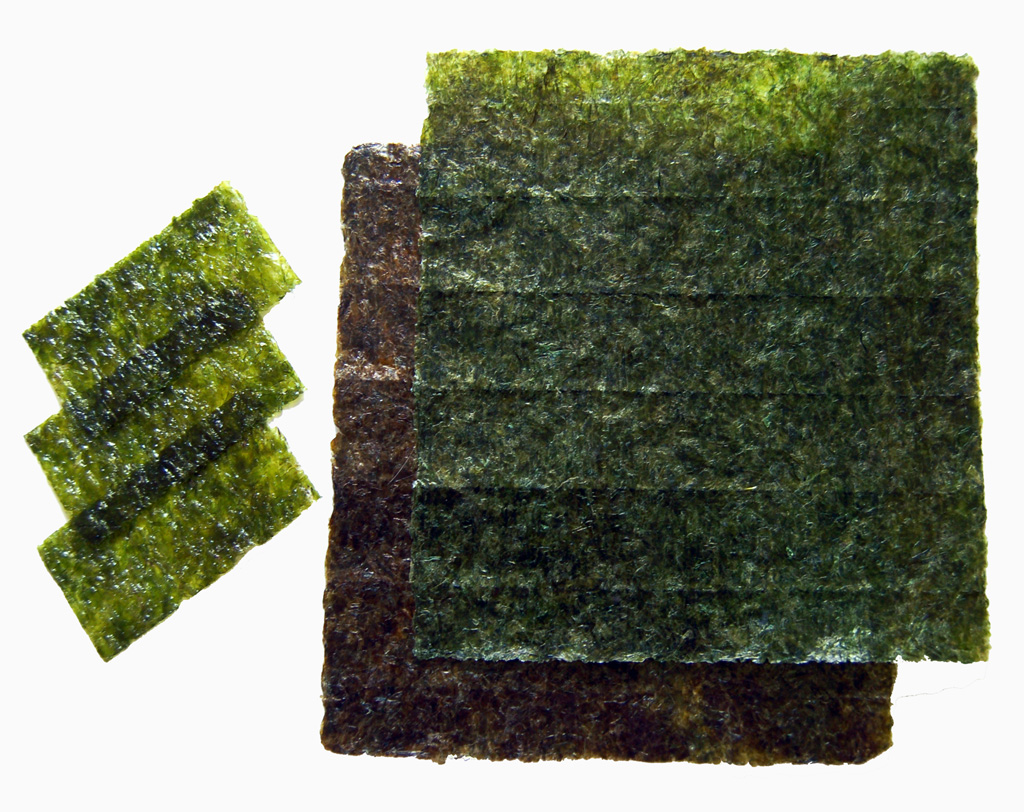
Dried nori sheets — the seaweed wrapper that holds every roll together. Photo by Alice Wiegand via Wikimedia Commons (CC BY-SA 3.0).
Stocking up for interactive dinners is half the fun. If you enjoy this kind of hands-on meal, our guide to the Best Ingredients for Hot Pot at Home will help you plan your next food night too.
Tools You Need (Nothing Fancy)
You do not need special equipment beyond one item: a bamboo rolling mat, called a makisu. It costs very little and does the shaping work for you. Cover it with cling film before you start, and cleanup takes seconds.
Beyond the mat, you already own everything else:
- A sharp knife for clean cuts
- A small bowl of water for your hands and the knife
- A cutting board
- A large bowl or wooden tub for mixing the rice
- A fan or a piece of cardboard for cooling the rice (optional but helpful)
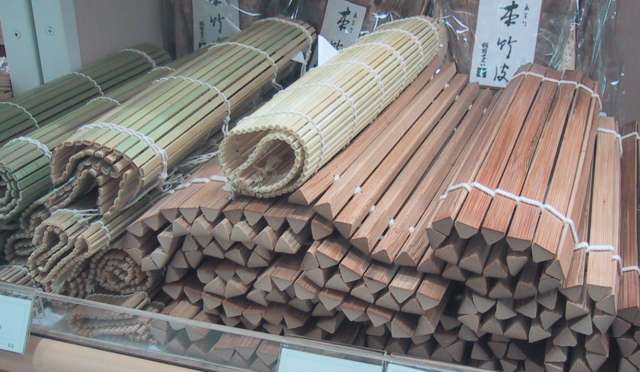
Bamboo rolling mats (makisu) — the one tool that makes rolling easy. Photo by Chris 73 via Wikimedia Commons (CC BY-SA 3.0).
How to Make Perfect Sushi Rice in 3 Steps
Sushi rice is the heart of every roll. Get the rice right, and everything else falls into place. The method is simple once you know it.
Step 1: Cook the rice. Rinse 2 cups of sushi rice under cold water until the water runs mostly clear. This removes extra starch and keeps the grains separate but sticky. Add the rice to a pot with 2 cups of water — a simple 1:1 ratio. Bring to a boil, then cover, lower the heat, and simmer for about 15 minutes. Turn off the heat and let it rest, covered, for 10 minutes. Do not lift the lid while it cooks.
Step 2: Season it. While the rice rests, warm 4 tablespoons of rice vinegar with 2 tablespoons of sugar and 1 teaspoon of salt in a small pan. Stir until the sugar dissolves. Do not boil it. Tip the hot rice into a large bowl and drizzle the seasoning over it. Fold gently with a spatula using cutting motions — never mash or stir hard, or the grains turn gummy.
Step 3: Cool it. Fan the rice for a few minutes while folding. This gives it a light shine and brings it to room temperature. Warm rice makes nori soggy, so be patient. Cover with a damp cloth until you are ready to roll.

Freshly cooked short-grain rice — the base of every good roll. Photo by epSos.de via Wikimedia Commons (CC BY 2.0).
3 Easy Rolls for Beginners
Start with these three. They use no raw fish, they are forgiving to roll, and they taste like the real thing.
1. Cucumber Roll (Kappa Maki)
This is the simplest roll you can make, which makes it the perfect first try. Lay a nori sheet shiny-side down on your covered bamboo mat. Wet your hands and spread a thin, even layer of rice over the nori, leaving a 1-inch strip bare at the far edge. Lay a few thin cucumber sticks across the center. Lift the near edge of the mat and roll away from you, tucking firmly as you go. Dab the bare nori strip with water and finish the roll to seal it.

Crisp cucumber kappa maki — the easiest first roll to master. Photo by Arashiyama via Wikimedia Commons (CC BY-SA 3.0).
2. California Roll
The California roll is rolled inside-out, with the rice on the outside and the nori hidden inside. It looks impressive but is very beginner-friendly. Spread rice over the full nori sheet, then flip the sheet over so the rice faces down on the cling-filmed mat. Add crab sticks, avocado slices, and cucumber strips in a line across the center. Roll firmly with the mat. Sprinkle sesame seeds over the rice before slicing for the classic look.

California rolls with crab, avocado and cucumber — rolled inside-out. Photo by Mk2010 via Wikimedia Commons (CC BY-SA 3.0).
3. Avocado Roll
Creamy, fresh, and fully vegetarian. Use the same inside-out method as the California roll, but fill with ripe avocado slices and cucumber. The key is ripe avocado — it should give gently when pressed but not feel mushy. A squeeze of lemon juice on the slices keeps them bright green while you work.

Creamy avocado maki — simple, fresh and vegetarian. Photo by Lablascovegmenu from London via Wikimedia Commons (CC BY 2.0).
How to Roll Sushi: The Beginner Method
Rolling feels awkward the first time and natural by the third roll. Follow this rhythm:
- Wet your hands. Sticky rice sticks to dry fingers. Keep a bowl of water nearby and re-wet often.
- Use less rice than you think. A layer about half an inch thick is enough. Too much rice makes fat rolls that will not seal.
- Line up the filling. Place filling strips in a straight horizontal line across the lower third of the rice.
- Tuck and roll. Lift the mat's near edge, fold it over the filling, and tuck firmly. Then roll forward in one smooth motion, applying even pressure.
- Seal the edge. Dab water on the bare nori strip and press to close.
- Cut with a wet, sharp knife. Wipe and re-wet the blade between cuts. Saw gently instead of pressing down, and you will get clean slices.

Tuck firmly and roll in one smooth motion — it feels natural by the third roll. Photo by bandita via Wikimedia Commons (CC BY-SA 2.0).
Dipping Sauces and Serving Ideas
Sauces turn good sushi into a great meal. Set out small dishes so everyone can mix and match:
- Classic soy sauce with a dab of wasabi stirred in
- Spicy mayo — mix mayonnaise with a little sriracha or chili sauce
- Ponzu — a light citrus-soy dip that suits vegetable rolls
- Sweet eel-style sauce — simmer soy sauce with sugar until slightly thick
Serve with pickled ginger between bites to reset your palate, and keep a pot of green tea or chilled water on the table. Many of these sauces pull double duty at other interactive dinners — our Hot Pot Dipping Sauces Guide: 15 Easy Recipes has plenty more ideas worth trying.

Soy sauce with wasabi — the classic pairing for every roll. Photo by Melissa Doroquez via Wikimedia Commons (CC BY-SA 2.0).
For serving, arrange sliced rolls on a large platter or wooden board. Group them by filling, add small bowls of ginger and edamame around the edges, and it looks like a restaurant spread with zero extra effort.
Common Mistakes to Avoid
Almost every beginner makes the same few mistakes. Knowing them in advance saves you a messy first batch:
- Using the wrong rice. Only short-grain sushi rice sticks properly. Long-grain rice makes rolls that crumble.
- Overfilling the rolls. A thin line of filling is enough. Packed rolls will not close or seal.
- Rolling too loosely. A loose roll falls apart when sliced. Tuck firmly at the start of each roll.
- Using warm rice. Warm rice steams the nori and turns it chewy. Let the rice reach room temperature first.
- Cutting with a dry knife. A dry blade drags the rice and tears the nori. Wet the knife and wipe it clean between every few cuts.
- Skipping the water seal. That bare strip of nori needs a dab of water, or the roll will unroll itself on the plate.
Creative Ideas for Your Sushi Night
Once the basic rolls feel easy, make the evening your own:
- Temaki party. Set out nori sheets, rice, and fillings, and let everyone roll their own cone-shaped hand rolls. No mat needed, and it is even more social than maki.
- Sushi bake. Layer seasoned rice, fillings, and spicy mayo in a dish, bake until bubbly, and scoop with nori squares. All the flavor, none of the rolling.
- Rainbow platter. Assign each guest a color — cucumber green, salmon orange, avocado green, crab red — and build one big multicolor platter together.
- Theme the table. Low lighting, a simple table runner, chopsticks at each seat, and small dishes for sauces turn a weeknight dinner into an event.
- Make it a series. One week sushi, the next week something new. If interactive dinners are your thing, How to Make Korean BBQ at Home is a natural next pick, and our Hot Pot for Beginners guide walks you through another crowd-pleasing food night.

Temaki hand rolls — perfect for a relaxed roll-your-own sushi party. Photo by Tiia Monto via Wikimedia Commons (CC BY-SA 3.0).
Final Thoughts
A DIY sushi night is proof that impressive food does not need to be complicated. Cook the rice well, keep your hands wet, roll firmly, and you will plate up sushi that looks and tastes wonderful. Start with the three beginner rolls above, and grow from there. Before long, sushi night might become your favorite tradition — or the star of a bigger Asian dinner night with friends. And when you are ready for another hands-on feast, give Korean BBQ at Home a try.
 Assorted sushi platter. Photo by Joapplestwothree via Wikimedia Commons (CC BY-SA 4.0). |
 Japanese-style sushi platter. Photo by Luvpixy via Wikimedia Commons (CC BY-SA 4.0). |
 Freshly rolled maki, ready to slice. Photo by JonaSali29 via Wikimedia Commons (CC BY-SA 4.0). |
 Vegetarian dragon roll with avocado. Photo by Loozrboy via Wikimedia Commons (CC BY-SA 2.0). |
Frequently Asked Questions
Can I make sushi without raw fish?
Yes, absolutely. A DIY sushi night at home can be completely beginner-friendly without using raw fish. You can use cooked shrimp, crab sticks, vegetables, or tofu instead.
What rice is best for sushi?
Short-grain sushi rice is the best option because it is sticky and holds the roll together properly.
How do I keep sushi from falling apart?
Make sure your rice is properly seasoned and not too dry. Also, avoid overfilling your rolls and roll them tightly.
Can I prepare sushi in advance?
It's best to eat sushi fresh, but you can prepare ingredients ahead of time to save effort during your sushi night.

No comments:
Post a Comment